 The Complete Process of Cleaning Student Accommodation: Start to Finish
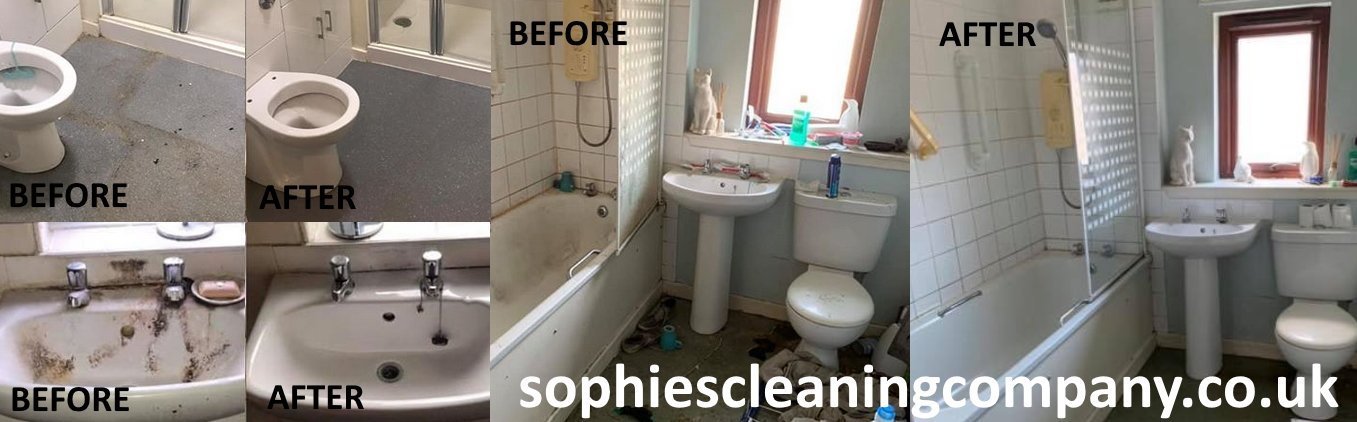
GET YOUR DEPOSIT BACK!
Student accommodation is a unique and dynamic space. Between the busy lifestyles, study sessions, social gatherings, and occasional “forgotten” chores, these spaces often experience varying levels of mess and disorganization. As a result, ensuring that student accommodations are cleaned properly – whether between tenants, during holidays, or after a long year – is crucial for maintaining hygiene, comfort, and a pleasant living environment.
Cleaning student accommodation is a systematic and thorough process that ensures every part of the space is addressed, from basic surface cleaning to more intensive tasks. Below is a step-by-step guide on the process of cleaning student accommodation from start to finish.
Step 1: Preparation & Initial Assessment
Before starting any cleaning job, it’s essential to assess the space. The first step is to walk through the student accommodation to:
- Evaluate the overall condition of the property: Check for general cleanliness and any areas that may need more attention.
- Identify potential issues: Look for stains, damaged furniture, or items that may need to be repaired or replaced.
- Gather the necessary supplies: Cleaning student accommodation requires a range of supplies, including cleaning products (disinfectants, degreasers, multi-surface cleaners), equipment (vacuums, mops, scrub brushes), and protective gear (gloves, masks, etc.).
Once the initial assessment is done, it’s time to organize and prepare the area for cleaning, making sure everything is set for a smooth cleaning session.
Step 2: Decluttering and Organizing
One of the first tasks when cleaning student accommodation is decluttering. This includes:
- Removing any personal belongings: If the accommodation is being prepared for new tenants, any personal items left behind by previous tenants should be cleared away. Items such as old clothes, food wrappers, or papers need to be removed to avoid unnecessary clutter.
- Disposal of trash: Gather and dispose of any leftover trash in bins or recycling containers. Be thorough, checking all corners and areas like under beds or behind furniture where waste might accumulate.
Clearing the space of unnecessary items will make the cleaning process more effective and ensure no areas are missed.
Step 3: Surface Cleaning
Once the space is decluttered, it’s time to tackle surface cleaning. This stage focuses on wiping down and sanitizing all flat surfaces, such as:
- Countertops and tables: Use disinfectant and cloth to wipe down desks, dining tables, and kitchen surfaces.
- Doors and windows: Clean door handles and windows, ensuring that they are free from fingerprints and smudges.
- Shelves and storage areas: Dust and wipe down all shelving units, cabinets, and storage areas where dust and debris can accumulate.
- Light switches and plugs: Don’t forget the light switches and power outlets. These are high-touch areas that can harbor germs.
Paying attention to detail here is important to ensure that the space feels fresh and hygienic.
Step 4: Deep Cleaning
This is the most time-consuming and thorough part of the cleaning process. Deep cleaning tackles more difficult areas that require intensive work:
- Floors and carpets: Vacuum carpets and mop any non-carpeted floors. If there are stains on carpets, use a suitable stain remover to lift the stains, then go over the entire carpet with a vacuum cleaner to make sure it’s spotless.
- Bathroom cleaning: Bathrooms often require extra care, with tasks such as scrubbing showers, tubs, sinks, and toilets. Use strong disinfectants to remove soap scum, grime, and mildew. Don’t forget to clean the mirrors, taps, and light fixtures.
- Kitchen appliances: Cleaning the kitchen is one of the most important and time-consuming tasks in the process. Scrub the oven, microwave, fridge, and stove, ensuring all food residues are removed. Clean the interior and exterior of the refrigerator and dispose of any expired food.
- Walls and baseboards: Walls may need spot cleaning or a full wash to remove marks and stains, especially in high-traffic areas. Baseboards and corners often collect dust, so these should be wiped down too.
- Upholstery: If there are upholstered chairs or sofas, vacuum them thoroughly to remove dust and crumbs. Spot clean any stains using appropriate fabric cleaners.
Step 5: Bed & Furniture Cleaning
Beds and furniture often collect dust, dirt, and grime. This part of the process includes:
- Changing bed linens: Ensure that all bed linens (mattress covers, sheets, pillowcases) are washed and replaced. Clean any pillows or cushions that may have accumulated dirt or dust.
- Cleaning furniture: Dust or wipe down all furniture, including desks, chairs, drawers, and any shelving. If necessary, use fabric cleaners on upholstered furniture to eliminate odors and stains.
Step 6: Sanitation and Disinfection
Student accommodations are high-traffic areas, and sanitation is key to preventing the spread of germs and bacteria. Disinfection should focus on:
- High-touch areas: Pay special attention to door handles, light switches, remote controls, and any other high-touch surfaces.
- Bathrooms and kitchens: These spaces need thorough disinfection to prevent the growth of harmful bacteria and viruses.
- Air Quality: Use air purifiers or disinfectant sprays to help freshen the air and eliminate lingering odors.
Step 7: Final Touches
After the deep cleaning, it’s time to make the space inviting and comfortable. This step involves:
- Reorganizing furniture: Arrange furniture in a way that maximizes space and makes the room feel cozy and functional.
- Adding fresh scents: Air fresheners or scented candles can help give the room a pleasant, welcoming atmosphere.
- Final inspection: Walk through the accommodation one last time to ensure that all areas have been cleaned to a high standard. Double-check every corner to make sure no areas were overlooked.
Step 8: Ongoing Maintenance
Once the accommodation is cleaned, it’s important to establish a regular cleaning routine to maintain cleanliness. Whether it’s setting up a cleaning schedule for the students or offering ongoing cleaning services, consistent upkeep will ensure that the space remains in good condition.
Conclusion
Cleaning student accommodation is a comprehensive task that involves a series of steps, from decluttering to deep cleaning and final touches. A thorough cleaning not only creates a welcoming environment but also ensures that the space is safe, healthy, and ready for the next occupants. Whether for new tenants or post-year cleaning, maintaining the cleanliness of student accommodations is key to creating a positive and comfortable living space.
By following the proper cleaning process, you can ensure that student accommodations are ready to provide a clean and enjoyable home for students.
Sophie’s Cleaning Company Cover All Areas In Newcastle Upon Tyne And Many More Areas Including- County Durham, Sunderland, Northumberland And More..